
As COVID-19 forces changes to all of our working practices, awarding organisations are increasingly relying on remote office tools to maintain their service levels. To achieve this, a large proportion of organisations in this sector have selected Microsoft Teams as their communication and collaboration platform.
Recently released figures showed that in the 18 days preceding 20 March 2020, users of the platform grew from 32 to 44 million users and the percentage of organisations holding weekly Teams calls more than doubled from 21% to 43%.
At Protech, our employees have been using Teams extensively since it was launched and so have considerable experience with the platform. We have compiled some best practice that can help you to quickly get up to speed and improve the efficiency and productivity of your online meetings.
1.Sharing important emails within chats:
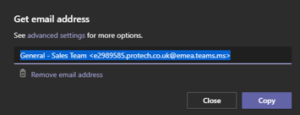
This feature within Teams provides users with channels to collaborate while reducing the number of emails cluttering your inbox. If an important email is received and required for discussion, it can be quickly shared across chats without needing to forward it to each individual’s email address.
a) Navigate to the channel in which you would like to share the email and select [Get Email Address] in the dropdown
b) Select [Copy] on the code provided and then open the email that you wish to share in Microsoft Outlook
c) Select [Forward] and then paste the address into the [To] box within Outlook; it will then appear directly in the selected chat for you to discuss with colleagues.
2. Saving important posts, conversation and chats:
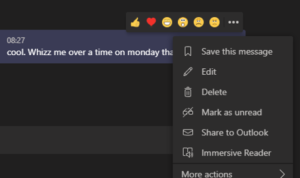
Many discussions on Teams contain important posts, conversations and chats that you may need to refer back to at some point. It’s easy to save any of these messages into a consolidated list for future reference.
a) Click onto the particular message you wish to save
b) Select [Save This Message]
c) You can then refer back to saved messages within your profile area
3. Locating group chats quickly and easily:

To locate group chats quickly and easily, you can rename them to something memorable and pin them so as to be easily accessible at the top of your chats list
a) To rename a chat, select the pencil next to the names of the people within your chat
b) Type a group name and then hit [Save]
c) To pin the chat so that it appears at the top of your list, select the ellipsis […] and then select [Pin].
4. Transcribe long, complex chats:
![]()
If you have a long chat message that is difficult to understand or follow, you can transcribe it so that the message is read out to you in audio. Hearing the words spoken can often give you a new perspective on a dense paragraph of text.
a) Click on the message you wish to transcribe
b) Select [Immersive Reader]
c) The message will then be read out to you in spoken audio
5. Shortcuts to improve productivity:
![]()
Teams has many shortcuts that can improve your productivity when using the platform. We have gathered some of the most useful below. Typing “/keys” into the search bar at the top of Teams will also provide a complete list of all keyboard shortcuts available.
CTRL + E Navigate quickly to search bar
CTRL + G Switch to another team
CTRL + N New chat
CTRL + 1 Activity
CTRL + 2 Chat
CTRL + 3 Teams
CTRL + 4 Meetings/Calendar
CTRL + 5 Calls/Speed Dial
CTRL + 6 Files
6. Manage your personal task list:
Managing all the tasks you have been assigned across various channels can be challenging. Teams is integrated with Microsoft Planner which allows you to see a complete picture of all tasks and deadlines assigned to you from all your teams. This helps you to plan your work accordingly. Actions that are assigned in Planner can be seen by clicking the ellipsis […] in the main menu on the left-hand side of Teams and then selecting [Planner].
To do this, the Planner tab needs to be added to your teams first and there are full instructions at the Microsoft support page.
7. Blur background to remove distractions:
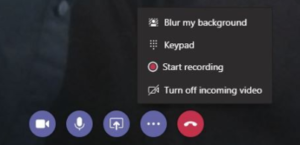
Teams has the ability to blur your background and remove any distractions from the video camera image so that the focus is on the individual rather than their surroundings. This can allow a wider choice of rooms to function as a professional office environment when collaborating online.
a) Start your video within a Teams meeting
b) Select the ellipsis […] icon from meeting options and select [Blur My Background]
8. Collate meeting notes:
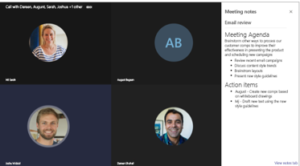
Teams allows you to take meeting notes whilst on an internal team call. Participants may be given access to them prior, during and after the meeting.
To share notes such as agendas or discussion points before a meeting, go to your calendar within Teams and select the meeting in question. You will then see a meeting notes tab at the top of the screen where you can add notes or use @ to bring something to people’s attention.
Once a meeting has started you can take notes by selecting [More Options], [Show Options] in meeting controls and [Start Taking Meeting Notes]. When you first add a note, a message will be posted on your behalf to all participants within the meeting chat. Meeting notes will be available once the meeting has concluded. These are available within the channel where the meeting occurred by selecting [Show Notes]. If you have made notes within a private one-to-one call, go to your chat list, find the meeting and select [Show Notes] in full screen.
9. Change your theme to dark:
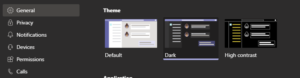
To improve your health and wellbeing, you may wish to consider changing the theme of your Teams application to dark mode. This can help to reduce eye strain, neck and shoulder pain, dry eyes, headaches and blurred vision
a) Go into your account in the top right-hand corner of the screen and click [Settings]
b) Select [Dark Mode]
10. Record a meeting:

It’s easy to record your meetings in Teams by capturing its audio, video and screen sharing activity. You can keep this for reference or provide a copy of the recording to your internal contacts
- Once you are in a meeting, select the ellipsis […] and click [Start Recording]. Everyone in the meeting will be notified that the recording has started
- To stop recording, go to the meeting controls and select [More Options] and stop the recording.
- Upon completion, the person who requested the recording receives an email from Microsoft Stream when it is available. It also shows up in the meeting chat or in the channel.